Thursday, May 29, 2014

Lint roller???


  Hi everyone!  It's been hectic as usual around here, but the good news is my grand babies are coming!  Long story short, we've worked it out, and grampa and I couldn't be any happier!  This blog post is the very l-a-t-e Terrific Tip Time... it's about using a LINT ROLLER in place of a brayer.
    The idea came to me early one morning (about 2:00 a.m. I think), when I wanted to try a brayer look, but realized I didn't have one.  So... lightbulb moment... ta dah!  I'll use a lint roller!


    The first thing you need to do is rub it all over your clothes to get most of the sticky stuff off.  The four colors of ink I used for this card are Crumb Cake, Soft Suede, Marina Mist and Pear Pizzazz.  The cardstock is Very Vanilla.  For the blue and green piece, start by loading your lint roller with some Marina Mist.  Work on a sheet of waxed paper, and begin rolling the ink onto your paper.  The lines will be softer and leave white bits, which is what I was looking for.  You can choose to add more ink or less, it's your design!  When you're done with the Marina Mist, change the tape on your lint roller to a clean one.  Again, rub on your clothes (you should have spotless clothes by the time you're done with this card!).  Add the Pear Pizzazz to it and start filling in your cardstock to however you would like it.
    With another half sheet of very vanilla, do the very same thing, with another clean lint roller, using crumb cake.  Add small bits of soft suede, so that it looks antiqued.  Do the same thing with a piece of 5 3/8 x 4 1/8 of Marina Mist.  And again to another half sheet of very vanilla (your card base).


  I used three stamp sets with this card.  World Map, The Open Sea and our new set Traveler.  I stamped a piece of crumb cake (5 1/4 x 4) with the World Map.  Once done, I ran the crumb cake/soft suede lint roller over it, and then ripped the edges and shaded them with soft suede.  Then I softened up the paper by running my bone folder over it again and again.  I didn't want the wrinkled look, hence no crumbling of paper!
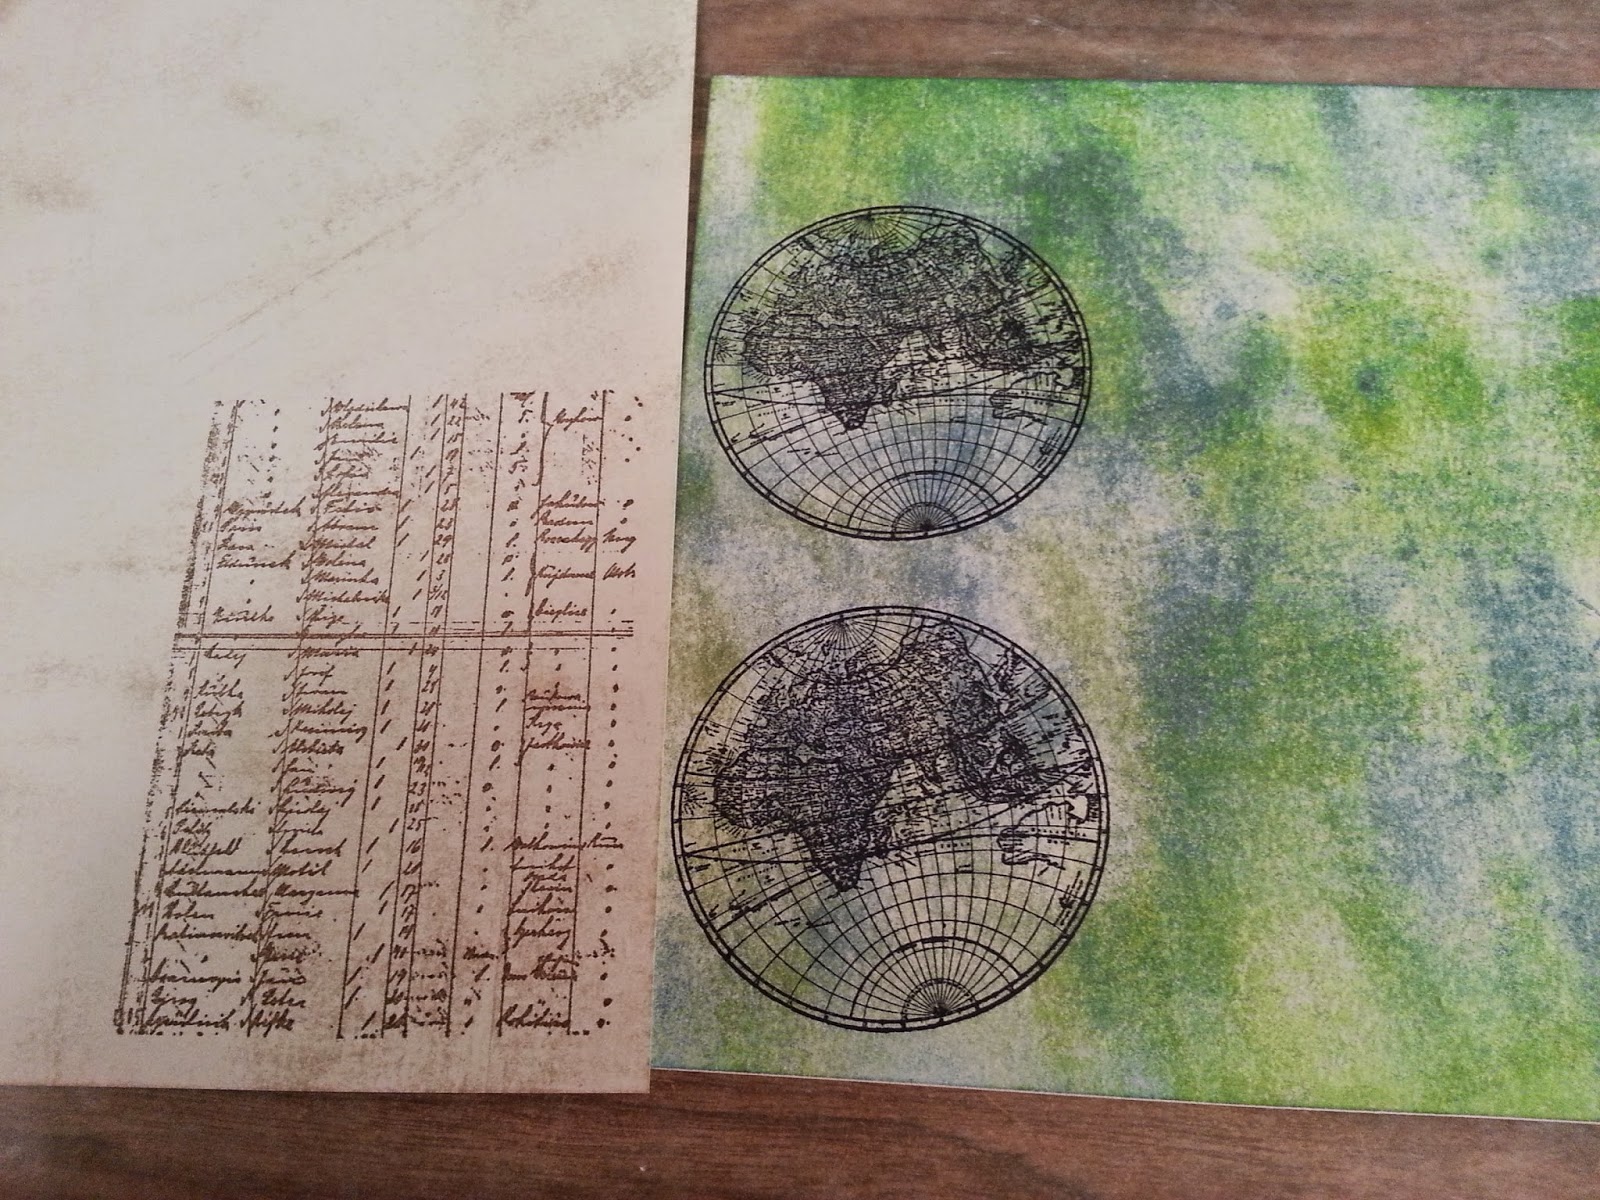
    Then, on a piece of lint rollered vanilla, I stamped the manifest page from The Open Sea in Soft Suede. Tear, shade and distress the edges again.   I also stamped the tiny passport on the same sheet, using the same suede.  The ship was stamped with black stazon on the same vanilla sheet.   Next, stamp the globe from The Open Sea onto the Marina Mist and Pear Pizzazz masterpiece you created!  Cut by hand or circle framelit.
    I used a small piece of burlap ribbon and frayed the edges a little and cut it into a banner shape.  Using linen thread I sewed little "X's" on the left.
   Place your crumb cake piece down first, then the manifest piece.  Next, determine where you want your other three pieces and pop dot those.  I did a little extra fussy cutting on the ship so the globe would show through.
   Last touch was to add some more linen thread and a tiny gold anchor that I found in the jewelry department!  A little sentiment at the bottom would look nice but I don't think it's necessary.
    This card took me about an hour, which isn't bad when you're making a card for that special someone!  And Father's Day is right around the corner!  Happy stamping, and happy rolling!!  LOL!  Toodles

Monday, May 26, 2014

Try a little tenderness...


    Happy Memorial Day everyone. I'd like to take this opportunity to thank all those men and women who have served our great country, including my Grandfather, my Father, my Husband, and my son-in-law.  We are a very proud military family (I served myself for 4.5 years), and I wouldn't change a thing!  
     I wanted to mark today's solemness with a couple of sympathy cards.  The first one is done in Wisteria Wonder, Basic Gray and Whisper white.  I love the simplicity of this tree.  I chose to add some pearls along the punched border instead of in the tree as I've seen in other cards.  A simple punched Praying for You and a neat knot bow finishes it off nicely.  I did use an Anna Griffin embossing folder... I just wanted a floral background.  The rest is all Stampin' Up! though!


   This next card is done with black, whisper white and wild wasabi.  I used some ribbon I'd gotten on the clearance rack (love it!).  The stamp set is Serene Silhouettes and Teeny Tiny Wishes.  Three tiny pearls add a little shuzzhh (a British term I picked up while living in England for 7 years)!  The embossing folder is our Fancy Fan one!

    The neat thing about these two cards is that you can change the sentiments and have two completely different cards!  Experiment by changing out the stamped images as well to come up with completely different cards!  The possibilities are endless with these simple layouts.   I hope you enjoyed these, and they inspire you to create your own 'works of art'!
   
     Until next time, toodles!

Friday, May 23, 2014

You're "Sew" Special!


    Happy Friday everyone!  Whoo hoo!!  Time for the weekend, and possibly a meteor shower tonight, clouds permitting!  Today I'm sharing a card I CASED off of Pinterest; but I changed the papers.  I had some retired Stampin' Up! DSP that I thought reminded me of retro quilt fabric.  I cut them into half inch strips, and the middle square is 1 1/4.  To start, take a white piece of paper cut at 4 x 5 1/4.  Eyeball the square and adhere it to the middle of your card.  Take your first strip (in my case the poppy) and lay it next to the square, edges flush.  Adhere, and trim off the edge.  Turn your card counter-clockwise, and lay another poppy strip flat edge to flat edge.  Trim off excess .  Repeat until you have the first 4 strips laid.  Continue going around and around like this until your whole white piece of paper is covered up.
      When you're finished with that, choose an embossing folder that gives the look of quilted lines (I used the Modern Mosaic one.), and emboss.  Mount on a coordinating colored back (4 1/8 x 5 3/8).  Make a simple border strip in whisper white, and add a strip of ribbon with a knot bow.  Add a few buttons or whatever you have available to keep it in the 'sewing' theme!  If you're really feeling the 'sewing' theme, do a little machine stitching or hand stitching as well!
    I chose not to add a sentiment, but a small one using the word window punch would look cute on the bottom right.  Especially now that starting June 2nd you'll be able to get your hands on an alphabet wheel, so you can customize your sentiments even more!  It's item # 133769;  it's $14.95; and it has space for 13 characters!
   Hope you enjoyed this little card.  I fell in love with it when I first saw it!  It looks harder than it actually is, so whoever is the recipient is going to think you slaved for hours making it!!!    Have a great weekend, and see you next week!  Don't forget to check back  for Tuesday's Terrific Tip!  Toodles!!

Thursday, May 22, 2014

Where does the time go?


   Hi everyone!  I could have sworn that today was Wednesday... but nope... so I'm a day late with this post!  I hope you all are keeping better track of time than me!  
    Today I'm posting a project that uses our new Blackberry Bliss color... can I just say that I LOVE THIS COLOR!  (no, I'm not yelling, I'm just excited!)  I created my own DSP by stamping Stippled Blossoms with Blackberry Bliss on whisper white; and then cut a circle using my circle framelits.  I also cut one the next size up of the Blackberry for the mat.  Cut them in half and layer, then place on a piece of whisper white that you have embossed (this particular folder isn't Stampin Up, but it's one of my Monday Senior card class ladies favorites).
     I stamped one of the images from Serene Silhouettes in Mossy Meadow and rounded two of the edges to give it a little wow factor.  I also matted it on some Mossy Meadow paper.  Add a few pearls, and use dimensionals to pop it up a bit.  Add a butterfly using the butterfly punch and Papillion Potpourri stamp set.  She deserves a few pearls too!  Add a small knot of Blackberry Bliss ribbon, and voila'!
    I hope you enjoy this little project!  I'll post another one tomorrow, since I'm behind a bit!  Have a good day!  Toodles

Monday, May 19, 2014

It's Monday! Yippee-Skippee!


    Happy Monday everyone!  Hope you all had a wonderful weekend!  My husband got a new phone this weekend, so he hands it to me so I can look at it, and the very first thing I do is hit the FACE TIME button to call my grand kids!  Omgosh, that is a-w-e-s-o-m-e!  We skype, but this is so much better!  Yes, I love my grand babies and miss them so very much!
     Today's card is inspired off of one I'd seen on Pinterest (cannot remember the name of the designer!).  For my card, I chose to use the new Moonlight 4 1/2 x 6 1/2 pad in the upcoming new catalog!  I also used  Lost Lagoon and Hello Honey (new In-colors).  The neutrals are Basic Gray and Whisper White.

TERRIFIC TIP TIME:
    I do have a tip for cutting hexagons with our punch!  So you don't waste paper unnecessarily, start by punching half of a hexagon on the bottom right side of your sheet.  Then, line up your punch to punch a full one UP and to the LEFT of it.  Keep going with half, full, half, full until you've gone across the paper.  You should now be able to line your punch up for maximum hexagons with little or no wastage!  And for cards like this one, save those little scraps because you never know when you're going to need one to stick somewhere to fill a gap!

    I hope you enjoyed this edition of Terrific Tip Time.  I'm going to try and incorporate them into my blog posts at least once a week!  Happy creating, and toodles!!

Friday, May 16, 2014

Blackberry Bliss, oh my!


    It's Friday!  Whooeee!!!  Okay, I don't know if you've checked out the new colors we have, but can you say OH MY GOSH!  I am loving them!!
     Blackberry Bliss, Hello Honey, Lost Lagoon, Mossy Meadow and Tangelo Twist...  They are so rich and saturated, and just plain beautiful!  I am having so much fun playing with them, and I can't wait to post all the projects I've got done and the ones still in my head!
    For this card, I used our new Moonlight 4 1/2 x 6 1/2 pad (love these!).  Double sided heaven!  I used Sahara Sand as my neutral, and just had to make my favorite color combination (purple and yellow) with the blackberry bliss and hello honey!  The pinwheel is made with 1 1/4 squares, opposite corners rounded, and cut in half from point to point.  Assemble on a 1 inch circle.  Top with hello honey 1 inch circle, and then a 7/8 scallop punch of blackberry!  Top with a teeny bow of our vanilla and gold twine!
   I added some of the new 2014-2016 in color ribbon (it's gorgeous), and a tiny bit of bling with a gold punched star!  Easy-peasy, lemon squeezy!  This card literally goes together in like 10 minutes!
    I hope you enjoy it and give it a try!  Toodles!

Wednesday, May 14, 2014

Bon Voyage!


   Happy Wednesday everyone!  It's hump day!  I thought I would post a card I made with one of my favorite NEW stamp sets and one of my favorite OLD stamp sets!  The new one is Traveler; 134513 Clear, $19.95!  It's got amazing line work, and stamps beautifully!  The OLD stamp is the World Map, 130345 Clear, $13.95.
    I used Sahara Sand, Whisper White and our lovely new Lost Lagoon!  It's a very simple card, and I didn't put a sentiment on the outside because I thought it would detract from the beauty of the stamps.  Plus, this way you can make it any occasion you need it for!
   I hope this inspires you to create something awesome!  If you're interested in ordering, let me know!
   Toodles!

Monday, May 12, 2014

Oh Look! It's Blendabilities!


   Happy belated Mother's Day to all you mommies out there!  I hope you all had a wonderful day!   I thought I would share with you today our new Blendabilities from Stampin' Up! Having had bad luck with "other" alcohol markers on the market, I was a little nervous at first, to even try them; even though I love, love, love to color with crayons!  I actually used to have the whole 64 box of crayons memorized!  I still miss Lemon Yellow...  Anyway....
    I decided to give them a try, and well... I'm hooked!  My downline came over and we played for almost 2 hours coloring with every color I had pre-ordered!  They are amazing to use, they blend extremely well, and they feel very comfortable in your hand.  I do have to note that you will need to use Memento Ink to stamp your image, because you can't mix alcohol and alcohol (i.e., Stazon with Alcohol markers).  Just like you can't use the Memento with our normal markers because you will get the dreaded 'bleeding' effect.
     That all being said, I cannot wait to get my hands on all of our other colors and I'm hoping that they come out with a Blendability set for every stamp/ink color we have!  Here are a few more pictures of some of what we played with!
      This is the Pumpkin Pie set with the Cherry Cobbler center:
             This is the Old Olive set with a Pumpkin Pie center:
            This is the Coastal Cabana set with a Daffodil Delight center:
           This is the Rich Razzleberry set with our Fleshtone center:
     

       My favorite one has to be the Coastal Cabana, followed by Cherry Cobbler!  I hope you've enjoyed a little sneak peak into the newest addition to our Stampin' Up! marker family!  Don't be afraid to try them, and they are considerably less expensive than others found on the market (which I've tried), and I love these so much more!  No more guessing which color is going to go with which color.  Each set is ONE color... the normal shade of it, a darker shade, and a lighter shade.  No guesswork, no boo boos.  And... it matches the cardstock!  And... the inks!  What more could you ask for?  So, now that you know about them, how many sets can I put you down for?!!

Friday, May 9, 2014

Happy Mother's Day!


     Happy Friday everyone!  Yaayy!  It's the weekend!  Although the weekend is when I do most of my work!  I design and kit about 80 - 100 cards every weekend for my Monday card class, and since I'm one of the world's worst procrastinators... well, you get the picture.  Although, in my defense, I've been getting them all done by Saturday night, or Sunday Morning, depending on what time I actually finish!
     The daffodil card above is one of the ones we did for Stampin' Up club, and for card class!  I love it when I can do double duty with one card!  I actually saw this on Pinterest, and CASED it because I fell in love with it!
    It uses our wonderful Hardwood stamp!  I hand cut the pot, and used the word window punch for the top of it.  Loving the new fringe scissors (they cut much easier and smoother than the M.S. ones)!  I used the petite flowers punch and boho blossoms punch for the daffodils!  Add a touch of daffodil delight ribbon, and a sentiment of your choosing, and you have an adorable card to give to someone special, or someone who needs a pick-me-up!  Who wouldn't want some sunny daffy's!
    Have a great day!  Toodles!

Wednesday, May 7, 2014


  Hi everyone!  Since the name of my blog is All Cracked Up Designs (and no place to scrap), I thought I would be remiss if I didn't do a scrapbook layout!  
    I used all Stampin' Up products for this, except for the large doily.  The papers are from our Sale-a-Bration brochure, and they have to be my favorite papers yet!  The background is coordinations Pool Party, and the picture mats are Crumb Cake, stamped with our new Hardwood stamp (another favorite).  It really is easy to create awesome projects when you've got so many wonderful products to choose from!  That's one of the reasons I love Stampin' Up!  Everything coordinates, and projects just GO together easily and beautifully!  
    Don't forget we've got our new catalog coming out June 1st, and it's loaded with fun and creative stuff and I can't wait to show you some things I've been working on!  Stay tuned !  I'll post some sneak peaks tomorrow!  Toodles!